This is the documentation for the Nextflow online tutorial that will take place on the framework of the 'Reproducible genomics workflows using Nextflow and nf-core' workshop organized by BovReg and the CRG.
The aim of this guide is to cover a vast part of Nextflow features ranging from basic to advanced language aspects.
1. Setup
1.1. Requirements
Nextflow can be used on any POSIX compatible system (Linux, OS X, etc). It requires Bash and Java 8 (or later) to be installed.
Optional requirements:
-
Docker engine 1.10.x (or later)
-
Singularity 2.5.x (or later, optional)
-
Conda 4.5 (or later, optional)
-
Graphviz (optional)
-
AWS CLI (optional)
-
AWS Cloud 9 environment properly configured (optional)
1.2. Training materials download
Once you launched the environment, download the training materials running the command below on the terminal window that you will find at the botton of the page:
aws s3 sync s3://cbcrg-eu/nf-training-bovreg .|
Don’t miss the ending dot in the above command. |
We recommend to follow this tutorial using the AWS Cloud 9 environment. However, if you want to use your machine you can
alsodownload all the materials using curl:
curl https://cbcrg-eu.s3-eu-west-1.amazonaws.com/nf-training-bovreg/nf-training-bovreg.tar.gz | tar xvzOr alternatively if you have wget instead of curl in your machine:
wget -q -O- https://cbcrg-eu.s3-eu-west-1.amazonaws.com/nf-training-bovreg/nf-training-bovreg.tar.gz | tar xvz1.3. Environment setup
To complete the environment setup you just need to run the script below, which installs Java an other requirements for this tutorial.
source setup/all.sh1.4. Nextflow Installation
Install the latest version of Nextflow copy & pasting the following snippet in a terminal window:
curl https://get.nextflow.io | bash
mv nextflow ~/bin
Check the correct installation running the following command:
nextflow info2. Get started with Nextflow
2.1. Basic concepts
Nextflow is workflow orchestration engine and a programming domain specific language (DSL) that eases the writing of data-intensive computational pipelines.
It is designed around the idea that the Linux platform is the lingua franca of data science. Linux provides many simple but powerful command-line and scripting tools that, when chained together, facilitate complex data manipulations.
Nextflow extends this approach, adding the ability to define complex program interactions and a high-level parallel computational environment based on the dataflow programming model. Nextflow core features are:
-
enable workflows portability & reproducibility
-
simplify parallelization and large scale deployment
-
easily integrate existing tools, systems & industry standards
2.1.1. Processes and channels
In practice a Nextflow pipeline script is made by joining together different processes. Each process can be written in any scripting language that can be executed by the Linux platform (Bash, Perl, Ruby, Python, etc.).
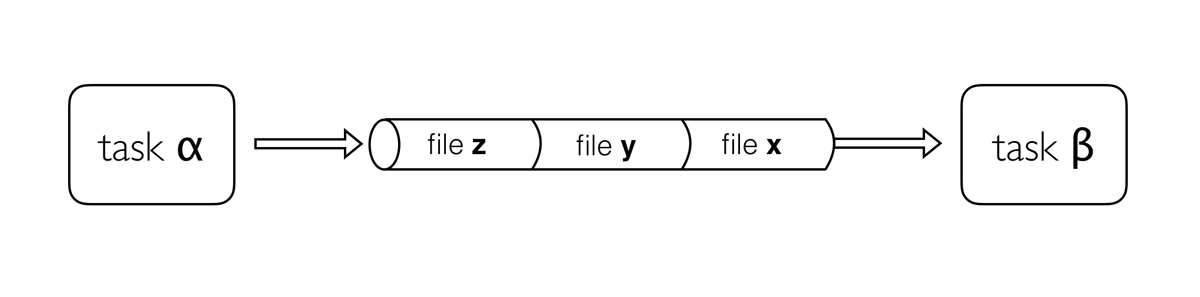
Processes are executed independently and are isolated from each other, i.e. they do not share a common (writable) state. The only way they can communicate is via asynchronous FIFO queues, called channels in Nextflow.
Any process can define one or more channels as input and output. The interaction between these processes, and ultimately the pipeline execution flow itself, is implicitly defined by these input and output declarations.
2.1.2. Execution abstraction
While a process defines what command or script has to be executed, the executor determines how that script is actually run in the target system.
If not otherwise specified, processes are executed on the local computer. The local executor is very useful for pipeline development and testing purposes, but for real world computational pipelines an HPC or cloud platform is often required.
In other words, Nextflow provides an abstraction between the pipeline’s functional logic and the underlying execution system. Thus it is possible to write a pipeline once and to seamlessly run it on your computer, a grid platform, or the cloud, without modifying it, by simply defining the target execution platform in the configuration file.
It provides out-of-the-box support for major batch schedulers and cloud platforms:
-
Grid engine (Open/Sun/Univa)
-
IBM Platform LSF
-
Linux SLURM
-
PBS Works
-
Torque
-
Moab
-
HTCondor
-
Amazon Batch
-
Google Life Sciences
-
Kubernetes
2.1.3. Scripting language
Nextflow implements declarative domain specific language (DSL) simplifies the writing of writing complex data analysis workflows as an extension of a general purpose programming language.
This approach makes Nextflow very flexible because allows to have in the same computing environment the benefit of concise DSL that allow the handling of recurrent use cases with ease and the flexibility and power of a general purpose programming language to handle corner cases, which may be difficult to implement using a declarative approach.
In practical terms Nextflow scripting is an extension of the Groovy programming language, which in turn is a super-set of the Java programming language. Groovy can be considered as Python for Java in that is simplifies the writing of code and is more approachable.
2.2. Your first script
Copy the following example into your favourite text editor and save it to a file named hello.nf :
#!/usr/bin/env nextflow

params.greeting  = 'Hello world!'
greeting_ch = Channel.from(params.greeting)

process splitLetters {

    input:
    val x from greeting_ch

    output:
    file 'chunk_*' into letters

    """
    printf '$x' | split -b 6 - chunk_
    """
}

process convertToUpper {

    input:
    file y from letters.flatten()

    output:
    stdout into result

    """
    cat $y | tr '[a-z]' '[A-Z]'
    """
}

result.view{ it.trim() }
This script defines two processes. The first splits a string into files containing chunks of 6 characters. The second receives these files and transforms their
contents to uppercase letters. The resulting strings are emitted on the result channel and the final output is printed by the view operator.
Execute the script by entering the following command in your terminal:
nextflow run hello.nfIt will output something similar to the text shown below:
N E X T F L O W  ~  version 20.10.0
Launching `hello.nf` [infallible_wilson] - revision: db17b351c4
executor >  local (3)
[ca/361e5c] process > splitLetters (1)   [100%] 1 of 1 ✔
[5a/44a867] process > convertToUpper (1) [100%] 2 of 2 ✔
HELLO
WORLD!
You can see that the first process is executed once, and the second twice. Finally the result string is printed.
It’s worth noting that the process convertToUpper is executed in parallel, so there’s no guarantee that the instance
processing the first split (the chunk Hello) will be executed before the one processing the second split (the chunk world!).
Thus, it is perfectly possible that you will get the final result printed out in a different order:
WORLD!
HELLO|
The hexadecimal numbers, like |
2.3. Modify and resume
Nextflow keeps track of all the processes executed in your pipeline. If you modify some parts of your script, only the processes that are actually changed will be re-executed. The execution of the processes that are not changed will be skipped and the cached result used instead.
This helps a lot when testing or modifying part of your pipeline without having to re-execute it from scratch.
For the sake of this tutorial, modify the convertToUpper process in the previous example, replacing the process script with the string
rev $y, so that the process looks like this:
process convertToUpper {

    input:
    file y from letters.flatten()

    output:
    stdout into result

    """
    rev $y
    """
}
Then save the file with the same name, and execute it by adding the -resume option to the command line:
nextflow run hello.nf -resumeIt will print output similar to this:
N E X T F L O W  ~  version 20.10.0
Launching `hello.nf` [gloomy_shockley] - revision: 2a9917d420
executor >  local (2)
[ca/361e5c] process > splitLetters (1)   [100%] 1 of 1, cached: 1 ✔
[56/522eae] process > convertToUpper (1) [100%] 2 of 2 ✔
olleH
!dlrow
You will see that the execution of the process splitLetters is actually skipped (the process ID is the same), and its results are retrieved from the cache. The second process is executed as expected, printing the reversed strings.
|
The pipeline results are cached by default in the directory $PWD/work. Depending on your script, this folder can take of lot of disk space. If your are sure you won’t resume your pipeline execution, clean this folder periodically. |
2.4. Pipeline parameters
Pipeline parameters are simply declared by prepending to a variable name the prefix params, separated by dot character.
Their value can be specified on the command line by prefixing the parameter name with a double dash character, i.e.
--paramName
For the sake of this tutorial, you can try to execute the previous example specifying a different input string parameter, as shown below:
nextflow run hello.nf --greeting 'Bonjour le monde!'The string specified on the command line will override the default value of the parameter. The output will look like this:
N E X T F L O W  ~  version 20.10.0
Launching `hello.nf` [distracted_hilbert] - revision: 2a9917d420
executor >  local (4)
[82/18a151] process > splitLetters (1)   [100%] 1 of 1 ✔
[a5/189102] process > convertToUpper (1) [100%] 3 of 3 ✔
uojnoB
m el r
!edno
3. Channels
Channels are a key data structure of Nextflow that allows the implementation of reactive-functional oriented computational workflows based on the Dataflow programming paradigm.
They are used to logically connect tasks each other or to implement functional style data transformations.
3.1. Channel types
Nextflow distinguish two different kinds of channels: queue channels and value channels.
3.1.1. Queue channel
A queue channel is a asynchronous unidirectional FIFO queue which connects two processes or operators.
-
What asynchronous means? That operations are non-blocking.
-
What unidirectional means? That data flow from a producer to a consumer.
-
What FIFO means? That the data is guaranteed to be delivered in the same order as it is produced.
A queue channel is implicitly created by process output definitions or using channel factories methods such as Channel.from or Channel.fromPath.
Try the following snippets:
ch = Channel.from(1,2,3)
println(ch)     (1)
ch.view() (2)| 1 | Use the built-in println function to print the ch variable. |
| 2 | Apply the view method to the ch channel, therefore prints each item emitted by the channels. |
Exercise
Try to execute this snippet, it will produce an error message.
p = Channel.from(1,2,3)
p.view()
p.view()| A queue channel can have one and exactly one producer and one and exactly one consumer. |
3.1.2. Value channels
A value channel a.k.a. singleton channel by definition is bound to a single value and it can be read unlimited times without consuming its content.
ch = Channel.value('Hello')
ch.view()
ch.view()
ch.view()
It prints:
Hello
Hello
Hello
3.2. Channel factories
3.2.1. value
The value factory method is used to create a value channel. An optional not null argument
can be specified to bind the channel to a specific value. For example:
ch1 = Channel.value()                 (1)
ch2 = Channel.value( 'Hello there' )  (2)
ch2 = Channel.value( [1,2,3,4,5] ) (3)| 1 | Creates an empty value channel. |
| 2 | Creates a value channel and binds a string to it. |
| 3 | Creates a value channel and binds a list object to it that will be emitted as a sole emission. |
3.2.2. from
The factory Channel.from allows the creation of a queue channel with the values specified as argument.
ch = Channel.from( 1, 3, 5, 7 )
ch.view{ "value: $it" }
The first line in this example creates a variable ch which holds a channel object. This channel emits the values specified as a parameter in the from method. Thus the second line will print the following:
value: 1
value: 3
value: 5
value: 7
Method Channel.from will be deprecated and replaced by Channel.of (see below)
|
3.2.3. of
The method Channel.of works in a similar manner to Channel.from, though it fixes some inconsistent behavior of the latter and provides a better handling for range of values. For example:
Channel
    .of(1..23, 'X', 'Y')
    .view()
3.2.4. fromList
The method Channel.fromList creates a channel emitting the elements provided by a list objects specified as argument:
list = ['hello', 'world']

Channel
    .fromList(list)
    .view()
3.2.5. fromPath
The fromPath factory method create a queue channel emitting one or more files
matching the specified glob pattern.
Channel.fromPath( '/data/big/*.txt' )This example creates a channel and emits as many items as there are files with txt extension in the /data/big folder. Each element is a file object implementing the Path interface.
Two asterisks, i.e. **, works like * but crosses directory boundaries. This syntax is generally used for matching complete paths. Curly brackets specify a collection of sub-patterns.
|
| Name | Description |
|---|---|
glob |
When |
type |
Type of paths returned, either |
hidden |
When |
maxDepth |
Maximum number of directory levels to visit (default: |
followLinks |
When |
relative |
When |
checkIfExists |
When |
Learn more about the blog pattern syntax at this link.
Exercise
Use the Channel.fromPath method to create a channel emitting all files with the suffix .fq in the data/ggal/ and any subdirectory, then print the file name.
3.2.6. fromFilePairs
The fromFilePairs method creates a channel emitting the file pairs matching a glob pattern provided by the user. The matching files are emitted as tuples in which the first element is the grouping key of the matching pair and the second element is the list of files (sorted in lexicographical order).
Channel
    .fromFilePairs('/my/data/SRR*_{1,2}.fastq')
    .view()
It will produce an output similar to the following:
[SRR493366, [/my/data/SRR493366_1.fastq, /my/data/SRR493366_2.fastq]]
[SRR493367, [/my/data/SRR493367_1.fastq, /my/data/SRR493367_2.fastq]]
[SRR493368, [/my/data/SRR493368_1.fastq, /my/data/SRR493368_2.fastq]]
[SRR493369, [/my/data/SRR493369_1.fastq, /my/data/SRR493369_2.fastq]]
[SRR493370, [/my/data/SRR493370_1.fastq, /my/data/SRR493370_2.fastq]]
[SRR493371, [/my/data/SRR493371_1.fastq, /my/data/SRR493371_2.fastq]]| The glob pattern must contain at least a star wildcard character. |
| Name | Description |
|---|---|
type |
Type of paths returned, either |
hidden |
When |
maxDepth |
Maximum number of directory levels to visit (default: |
followLinks |
When |
size |
Defines the number of files each emitted item is expected to hold (default: 2). Set to |
flat |
When |
checkIfExists |
When |
Exercise
Use the fromFilePairs method to create a channel emitting all pairs of fastq read in the data/ggal/
directory and print them.
Then use the flat:true option and compare the output with the previous execution.
3.2.7. fromSRA
The Channel.fromSRA method that makes it possible to query of NCBI SRA archive and returns a channel emitting the FASTQ files matching the specified selection criteria.
The query can be project ID or accession number(s) supported by the NCBI ESearch API. For example the following snippet:
Channel
    .fromSRA('SRP043510')
    .view()
prints:
[SRR1448794, ftp://ftp.sra.ebi.ac.uk/vol1/fastq/SRR144/004/SRR1448794/SRR1448794.fastq.gz]
[SRR1448795, ftp://ftp.sra.ebi.ac.uk/vol1/fastq/SRR144/005/SRR1448795/SRR1448795.fastq.gz]
[SRR1448792, ftp://ftp.sra.ebi.ac.uk/vol1/fastq/SRR144/002/SRR1448792/SRR1448792.fastq.gz]
[SRR1448793, ftp://ftp.sra.ebi.ac.uk/vol1/fastq/SRR144/003/SRR1448793/SRR1448793.fastq.gz]
[SRR1910483, ftp://ftp.sra.ebi.ac.uk/vol1/fastq/SRR191/003/SRR1910483/SRR1910483.fastq.gz]
[SRR1910482, ftp://ftp.sra.ebi.ac.uk/vol1/fastq/SRR191/002/SRR1910482/SRR1910482.fastq.gz]
(remaining omitted)
Multiple accession IDs can be specified using a list object:
ids = ['ERR908507', 'ERR908506', 'ERR908505']
Channel
    .fromSRA(ids)
    .view()
Results in:
[ERR908507, [ftp://ftp.sra.ebi.ac.uk/vol1/fastq/ERR908/ERR908507/ERR908507_1.fastq.gz, ftp://ftp.sra.ebi.ac.uk/vol1/fastq/ERR908/ERR908507/ERR908507_2.fastq.gz]]
[ERR908506, [ftp://ftp.sra.ebi.ac.uk/vol1/fastq/ERR908/ERR908506/ERR908506_1.fastq.gz, ftp://ftp.sra.ebi.ac.uk/vol1/fastq/ERR908/ERR908506/ERR908506_2.fastq.gz]]
[ERR908505, [ftp://ftp.sra.ebi.ac.uk/vol1/fastq/ERR908/ERR908505/ERR908505_1.fastq.gz, ftp://ftp.sra.ebi.ac.uk/vol1/fastq/ERR908/ERR908505/ERR908505_2.fastq.gz]]| Read pairs are implicitly managed are returned as a list of files. |
It’s straightforward to use this channel as an input using the usual Nextflow syntax. For example:
params.accession = 'SRP043510'
reads = Channel.fromSRA(params.accession)

process fastqc {
    input:
    tuple sample_id, file(reads_file) from reads

    output:
    file("fastqc_${sample_id}_logs") into fastqc_ch

    script:
    """
    mkdir fastqc_${sample_id}_logs
    fastqc -o fastqc_${sample_id}_logs -f fastq -q ${reads_file}
    """
}
The code snippet above creates a channel containing 24 samples from a chromatin dynamics study and runs FASTQC on the resulting files.
4. Processes
A process is the basic Nextflow computing primitive to execute foreign function i.e. custom scripts or tools.
The process definition starts with keyword the process, followed by process name and finally the process body delimited by curly brackets. The process body must contain a string which represents the command or, more generally, a script that is executed by it.
A basic process looks like the following example:
process sayHello {
  """
  echo 'Hello world!'
  """
}
A process may contain five definition blocks, respectively: directives, inputs, outputs, when clause and finally the process script. The syntax is defined as follows:
process < name > {
  [ directives ]        (1)
  input:                (2)
  < process inputs >
  output:               (3)
  < process outputs >
  when:                 (4)
  < condition >
  [script|shell|exec]:  (5)
  < user script to be executed >
}
| 1 | Zero, one or more process directives |
| 2 | Zero, one or more process inputs |
| 3 | Zero, one or more process outputs |
| 4 | An optional boolean conditional to trigger the process execution |
| 5 | The command to be executed |
4.1. Script
The script block is a string statement that defines the command that is executed by the process to carry out its task.
A process contains one and only one script block, and it must be the last statement when the process contains input and output declarations.
The script block can be a simple string or multi-line string. The latter simplifies the writing of non trivial scripts composed by multiple commands spanning over multiple lines. For example::
process example {
    script:
    """
    blastp -db /data/blast -query query.fa -outfmt 6 > blast_result
    cat blast_result | head -n 10 | cut -f 2 > top_hits
    blastdbcmd -db /data/blast -entry_batch top_hits > sequences
    """
}
By default the process command is interpreted as a Bash script. However any other scripting language can be used just simply starting the script with the corresponding Shebang declaration. For example:
process pyStuff {
  script:
  """
  #!/usr/bin/env python

  x = 'Hello'
  y = 'world!'
  print ("%s - %s" % (x,y))
  """
}| This allows the compositing in the same workflow script of tasks using different programming languages which may better fit a particular job. However for large chunks of code is suggested to save them into separate files and invoke them from the process script. |
4.1.1. Script parameters
Process script can be defined dynamically using variable values like in other string.
params.data = 'World'

process foo {
  script:
  """
  echo Hello $params.data
  """
}| A process script can contain any string format supported by the Groovy programming language. This allows us to use string interpolation or multiline string as in the script above. Refer to String interpolation for more information. |
Since Nextflow uses the same Bash syntax for variable substitutions in strings, Bash environment variables need to be escaped using \ character.
|
process foo {
  script:
  """
  echo "The current directory is \$PWD"
  """
}| Try to modify the above script using $PWD instead of \$PWD and check the difference. |
This can be tricky when the script uses many Bash variables. A possible alternative is to use a script string delimited by single-quote characters
process bar {
  script:
  '''
  echo $PATH | tr : '\\n'
  '''
}
However this won’t allow any more the usage of Nextflow variables in the command script.
Another alternative is to use a shell statement instead of script which uses a different
the following syntax for Nextflow variables: !{..}. This allow to use both Nextflow and Bash variables in
the same script.
params.data = 'le monde'

process baz {
  shell:
  '''
  X='Bonjour'
  echo $X !{params.data}
  '''
}
4.1.2. Conditional script
The process script can also be defined in a complete dynamic manner using a if statement or any other expression evaluating to string value. For example:
params.aligner = 'kallisto'

process foo {
  script:
  if( params.aligner == 'kallisto' )
    """
    kallisto --reads /some/data.fastq
    """
  else if( params.aligner == 'salmon' )
    """
    salmons --reads /some/data.fastq
    """
  else
    throw new IllegalArgumentException("Unknown aligner $params.aligner")
}
Exercise
Write a custom function that given the aligner name as parameter returns the command string to be executed. Then use this function as the process script body.
4.2. Inputs
Nextflow processes are isolated from each other but can communicate between themselves sending values through channels.
Inputs implicitly determine the dependency and the parallel execution of the process. The process execution is fired each time a new data is ready to be consumed from the input channel:
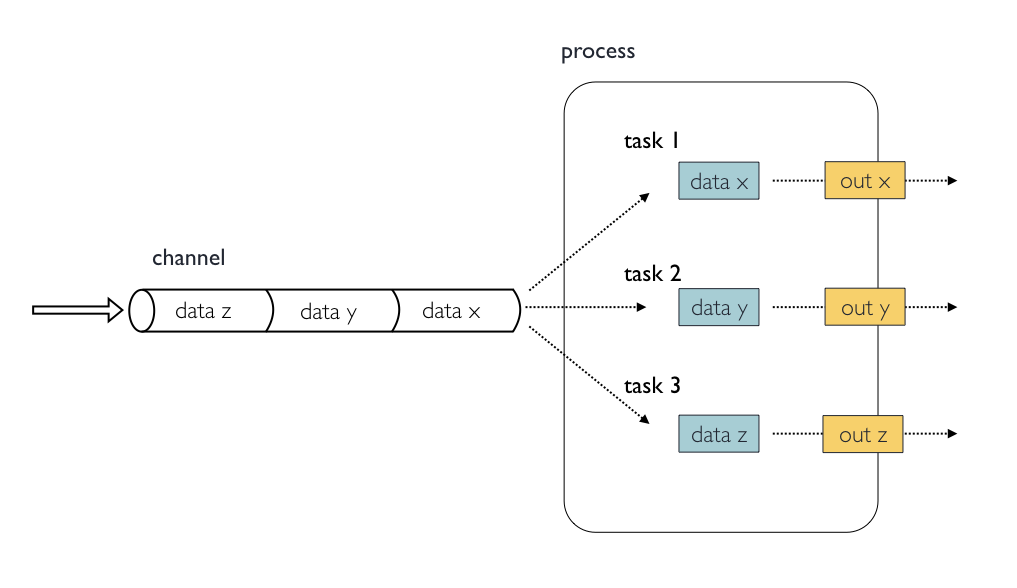
The input block defines which channels the process is expecting to receive inputs data from. You can only define one input block at a time and it must contain one or more inputs declarations.
The input block follows the syntax shown below:
input:
  <input qualifier> <input name> [from <source channel>]
4.2.1. Input values
The val qualifier allows you to receive data of any type as input. It can be accessed in the process script by using the specified input name, as shown in the following example:
num = Channel.from( 1, 2, 3 )

process basicExample {
  input:
  val x from num

  """
  echo process job $x
  """
}
In the above example the process is executed three times, each time a value is received from the channel num and used to process the script. Thus, it results in an output similar to the one shown below:
process job 3
process job 1
process job 2| The channel guarantees that items are delivered in the same order as they have been sent - but - since the process is executed in a parallel manner, there is no guarantee that they are processed in the same order as they are received. |
4.2.2. Input files
The file qualifier allows the handling of file values in the process execution context. This means that
Nextflow will stage it in the process execution directory, and it can be access in the script by using the name specified in the input declaration.
reads = Channel.fromPath( 'data/ggal/*.fq' )

process foo {
    input:
    file 'sample.fastq' from reads
    script:
    """
    your_command --reads sample.fastq
    """
}
The input file name can also be defined using a variable reference as shown below:
reads = Channel.fromPath( 'data/ggal/*.fq' )

process foo {
    input:
    file sample from reads
    script:
    """
    your_command --reads $sample
    """
}
The same syntax it’s also able to handle more than one input file in the same execution. Only change the channel composition.
reads = Channel.fromPath( 'data/ggal/*.fq' )

process foo {
    input:
    file sample from reads.collect()
    script:
    """
    your_command --reads $sample
    """
}
When a process declares an input file the corresponding channel elements must be file objects i.e.
created with the file helper function from the file specific channel factories e.g. Channel.fromPath or Channel.fromFilePairs.
|
Consider the following snippet:
params.genome = 'data/ggal/transcriptome.fa'

process foo {
    input:
    file genome from params.genome
    script:
    """
    your_command --reads $genome
    """
}
The above code creates a temporary file named input.1 with the string data/ggal/transcriptome.fa as content. That likely is not what you wanted to do.
4.2.3. Input path
As of version 19.10.0, Nextflow introduced a new path input qualifier that simplifies the handling of cases such as the one shown above.
In a nutshell the input path automatically handles string values as file objects. The following example works as expected:
params.genome = "$baseDir/data/ggal/transcriptome.fa"

process foo {
    input:
    path genome from params.genome
    script:
    """
    your_command --reads $genome
    """
}| The path qualifier should be preferred over file to handle process input files when using Nextflow 19.10.0 or later. |
Exercise
Write a script that creates a channel containing all read files matching the pattern data/ggal/*_1.fq followed by a process
that concatenates them into a single file and prints the first 20 lines.
4.2.4. Combine input channels
A key feature of processes is the ability to handle inputs from multiple channels. However it’s important to understands how the content of channel and their semantic affect the execution of a process.
Consider the following example:
process foo {
  echo true
  input:
  val x from Channel.from(1,2,3)
  val y from Channel.from('a','b','c')
  script:
   """
   echo $x and $y
   """
}
Both channels emit three value, therefore the process is executed three times, each time with a different pair:
-
(1, a)
-
(2, b)
-
(3, c)
What is happening is that the process waits until there’s a complete input configuration i.e. it receives an input value from all the channels declared as input.
When this condition is verified, it consumes the input values coming from the respective channels, and spawns a task execution, then repeat the same logic until one or more channels have no more content.
This means channel values are consumed serially one after another and the first empty channel cause the process execution to stop even if there are other values in other channels.
What does it happen when not all channels have the same cardinality (i.e. they emit a different number of elements)?
For example:
process foo {
  echo true
  input:
  val x from Channel.from(1,2)
  val y from Channel.from('a','b','c','d')
  script:
   """
   echo $x and $y
   """
}
In the above example the process is executed only two times, because when a channel has no more data to be processed it stops the process execution.
| Note however that value channel do not affect the process termination. |
To better understand this behavior compare the previous example with the following one:
process bar {
  echo true
  input:
  val x from Channel.value(1)
  val y from Channel.from('a','b','c')
  script:
   """
   echo $x and $y
   """
}
Exercise
Write a process that is executed for each read file matching the pattern data/ggal/*_1.fa and
uses the same data/ggal/transcriptome.fa in each execution.
4.2.5. Input repeaters
The each qualifier allows you to repeat the execution of a process for each item in a collection, every time a new data is received. For example:
sequences = Channel.fromPath('data/prots/*.tfa')
methods = ['regular', 'expresso', 'psicoffee']

process alignSequences {
  input:
  file seq from sequences
  each mode from methods

  """
  t_coffee -in $seq -mode $mode
  """
}
In the above example every time a file of sequences is received as input by the process, it executes three tasks running a T-coffee alignment with a different value for the mode parameter. This is useful when you need to repeat the same task for a given set of parameters.
Exercise
Extend the previous example so a task is executed for each read file matching the pattern data/ggal/*_1.fa and repeat the same task both with salmon and kallisto.
4.3. Outputs
The output declaration block allows to define the channels used by the process to send out the results produced.
There can be defined at most one output block and it can contain one or more outputs declarations. The output block follows the syntax shown below:
output:
  <output qualifier> <output name> [into <target channel>[,channel,..]]
4.3.1. Output values
The val qualifier allows to output a value defined in the script context. In a common usage scenario,
this is a value which has been defined in the input declaration block, as shown in the following example:
methods = ['prot','dna', 'rna']

process foo {
  input:
  val x from methods

  output:
  val x into receiver

  """
  echo $x > file
  """
}

receiver.view { "Received: $it" }
4.3.2. Output files
The file qualifier allows to output one or more files, produced by the process, over the specified channel.
process randomNum {

    output:
    file 'result.txt' into numbers

    '''
    echo $RANDOM > result.txt
    '''
}

numbers.view { "Received: " + it.text }
In the above example the process randomNum creates a file named result.txt containing a random number.
Since a file parameter using the same name is declared in the output block, when the task is completed that
file is sent over the numbers channel. A downstream process declaring the same channel as input will
be able to receive it.
4.3.3. Multiple output files
When an output file name contains a * or ? wildcard character it is interpreted as a
glob path matcher.
This allows to capture multiple files into a list object and output them as a sole emission. For example:
process splitLetters {

    output:
    file 'chunk_*' into letters

    '''
    printf 'Hola' | split -b 1 - chunk_
    '''
}

letters
    .flatMap()
    .view { "File: ${it.name} => ${it.text}" }
it prints:
File: chunk_aa => H
File: chunk_ab => o
File: chunk_ac => l
File: chunk_ad => a
Some caveats on glob pattern behavior:
-
Input files are not included in the list of possible matches.
-
Glob pattern matches against both files and directories path.
-
When a two stars pattern
**is used to recourse across directories, only file paths are matched i.e. directories are not included in the result list.
Exercise
Remove the flatMap operator and see out the output change. The documentation
for the flatMap operator is available at this link.
4.3.4. Dynamic output file names
When an output file name needs to be expressed dynamically, it is possible to define it using a dynamic evaluated string which references values defined in the input declaration block or in the script global context. For example::
sample_ch = Channel.from ('human', 'mouse')

process foo {

  input:
  val x from sample_ch

  output:
  file "${x}.txt" into sample_files_ch

  """
  touch ${x}.txt
  """
}

sample_files_ch.view()
In the above example, each time the process is executed an alignment file is produced whose name depends
on the actual value of the x input.
4.3.5. Composite inputs and outputs
So far we have seen how to declare multiple input and output channels, but each channel was handling only one value at time. However Nextflow can handle tuple of values.
When using channel emitting tuple of values the corresponding input declaration must be declared with a set qualifier followed by definition of each single element in the tuple.
In the same manner output channel emitting tuple of values can be declared using the set qualifier
following by the definition of each tuple element in the tuple.
reads_ch = Channel.fromFilePairs('data/ggal/*_{1,2}.fq')

process foo {
  input:
  set val(sample_id), file(sample_files) from reads_ch

  output:
  set val(sample_id), file('sample.bam') into bam_ch

  script:
  """
  touch sample.bam
  """
}

bam_ch.view()
In previous versions of Nextflow tuple was called set but it was used exactly with the same semantic. It can still be used for backward compatibility.
|
Exercise
Modify the script of the previous exercise so that the bam file is named as the given sample_id.
4.4. When
The when declaration allows you to define a condition that must be verified in order to execute the process. This can be any expression that evaluates a boolean value.
It is useful to enable/disable the process execution depending the state of various inputs and parameters. For example:
params.dbtype = 'nr'
params.prot = 'data/prots/*.tfa'
proteins = Channel.fromPath(params.prot)

process find {
  input:
  file fasta from proteins
  val type from params.dbtype

  when:
  fasta.name =~ /^BB11.*/ && type == 'nr'

  script:
  """
  blastp -query $fasta -db nr
  """
}
4.5. Directives
Directive declarations allow the definition of optional settings that affect the execution of the current process without affecting the semantic of the task itself.
They must be entered at the top of the process body, before any other declaration blocks (i.e. input, output, etc).
Directives are commonly used to define the amount of computing resources to be used or other meta directives like that allows the definition of extra information for configuration or logging purpose. For example:
process foo {
  cpus 2
  memory 8.GB
  container 'image/name'

  script:
  """
  your_command --this --that
  """
}
The complete list of directives is available at this link.
Exercise
Modify the script of the previous exercise adding a tag directive logging the sample_id in the execution output.
4.6. Organise outputs
4.6.1. PublishDir directive
Nextflow manages independently workflow execution intermediate results from the pipeline expected outputs. Task output files are created in the task specific execution directory which is considered as a temporary directory that can be deleted upon completion.
The pipeline result files need to be marked explicitly using the directive publishDir in the process that’s creating such file. For example:
process makeBams {
    publishDir "/some/directory/bam_files", mode: 'copy'

    input:
    file index from index_ch
    tuple val(name), file(reads) from reads_ch

    output:
    tuple val(name), file ('*.bam') into star_aligned

    """
    STAR --genomeDir $index --readFilesIn $reads
    """
}
The above example will copy all bam files created by the star task in the directory path /some/directory/bam_files.
The publish directory can be local or remote. For example output files could be stored to a AWS S3 bucket just using the s3:// prefix in the target path.
|
You can use more then one publishDir to keep different outputs in separate directory. For example:
4.6.2. Manage semantic sub-directories
You can use more then one publishDir to keep different outputs in separate directory. For example:
params.reads = 'data/reads/*_{1,2}.fq.gz'
params.outdir = 'my-results'

Channel
    .fromFilePairs(params.reads, flat: true)
    .set{ samples_ch }

process foo {
  publishDir "$params.outdir/$sampleId/", pattern: '*.fq'
  publishDir "$params.outdir/$sampleId/counts", pattern: "*_counts.txt"
  publishDir "$params.outdir/$sampleId/outlooks", pattern: '*_outlook.txt'

  input:
    set sampleId, file('sample1.fq.gz'), file('sample2.fq.gz') from samples_ch
  output:
    file "*"
  script:
  """
    < sample1.fq.gz zcat > sample1.fq
    < sample2.fq.gz zcat > sample2.fq

    awk '{s++}END{print s/4}' sample1.fq > sample1_counts.txt
    awk '{s++}END{print s/4}' sample2.fq > sample2_counts.txt

    head -n 50 sample1.fq > sample1_outlook.txt
    head -n 50 sample2.fq > sample2_outlook.txt
  """
}
The above example will create an output structure in the directory my-results, which contains a separate sub-directory for each given sample ID each of which contain the folders counts and outlooks.
5. Operators
-
Built-in functions applied to channels
-
Transform channels content
-
Can be used also to filter, fork and combine channels
5.1. Basic example
nums = Channel.from(1,2,3,4)         (1)
square = nums.map { it -> it * it }  (2)
square.view()                        (3)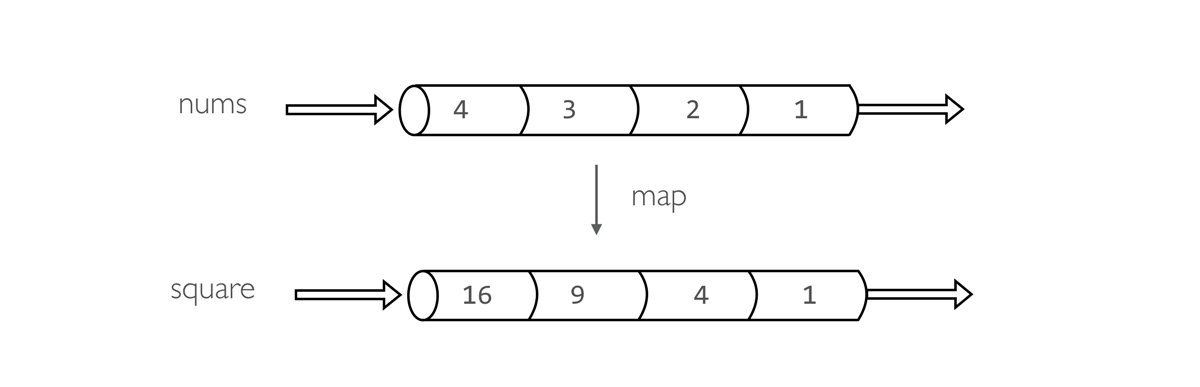
| 1 | Create a queue channel emitting four values. |
| 2 | Create a new channels transforming each number in it’s square. |
| 3 | Print the channel content. |
Operators can be chained to implement custom behaviors:
Channel.from(1,2,3,4)
        .map { it -> it * it }
        .view()
Operators can be separated in to five groups:
-
Filtering operators
-
Transforming operators
-
Splitting operators
-
Combining operators
-
Forking operators
-
Maths operators
5.2. Basic operators
5.2.1. view
The view operator prints the items emitted by a channel to the console standard output appending a
new line character to each of them. For example:
Channel
      .from('foo', 'bar', 'baz')
      .view()
It prints:
foo
bar
baz
An optional closure parameter can be specified to customise how items are printed. For example:
Channel
      .from('foo', 'bar', 'baz', 'qux')
      .view { "- $it" }
It prints:
- foo
- bar
- baz
5.2.2. map
The map operator applies a function of your choosing to every item emitted by a channel, and returns the items so obtained as a new channel. The function applied is called the mapping function and is expressed with a closure as shown in the example below:
Channel
    .from( 'hello', 'world' )
    .map { it -> it.reverse() }
    .view()
A map can associate to each element a generic tuple containing any data as needed.
Channel
    .from( 'hello', 'world' )
    .map { word -> [word, word.size()] }
    .view { word, len -> "$word contains $len letters" }
Exercise
Use fromPath to create a channel emitting the fastq files matching the pattern data/ggal/*.fq,
then chain with a map to return a pair containing the file name and the path itself.
Finally print the resulting channel.
Channel.fromPath('data/ggal/*.fq')
        .map { file -> [ file.name, file ] }
        .view { name, file -> "> file: $name" }
5.2.3. into
The into operator connects a source channel to two or more target channels in such a way the values emitted by the source channel are copied to the target channels. For example:
Channel
     .from( 'a', 'b', 'c' )
     .into{ foo; bar }

foo.view{ "Foo emits: " + it }
bar.view{ "Bar emits: " + it }
Note the use in this example of curly brackets and the ; as channel names separator. This is needed because the actual parameter of into is a closure which defines the target channels to which the source one is connected.
|
5.2.4. mix
The mix operator combines the items emitted by two (or more) channels into a single channel.
c1 = Channel.from( 1,2,3 )
c2 = Channel.from( 'a','b' )
c3 = Channel.from( 'z' )

c1 .mix(c2,c3).view()
1
2
a
3
b
z
The items in the resulting channel have the same order as in respective original channel,
however there’s no guarantee that the element of the second channel are append after the elements
of the first. Indeed in the above example the element a has been printed before 3.
|
5.2.5. flatten
The flatten operator transforms a channel in such a way that every tuple is flattened so that each single entry is emitted as a sole element by the resulting channel.
foo = [1,2,3]
bar = [4, 5, 6]

Channel
    .from(foo, bar)
    .flatten()
    .view()
The above snippet prints:
1
2
3
4
5
6
5.2.6. collect
The collect operator collects all the items emitted by a channel to a list and return the resulting object as a sole emission.
Channel
    .from( 1, 2, 3, 4 )
    .collect()
    .view()
It prints a single value:
[1,2,3,4]
The result of the collect operator is a value channel.
|
5.2.7. groupTuple
The groupTuple operator collects tuples (or lists) of values emitted by the source channel grouping together the elements that share the same key. Finally it emits a new tuple object for each distinct key collected.
Try the following example:
Channel
     .from( [1,'A'], [1,'B'], [2,'C'], [3, 'B'], [1,'C'], [2, 'A'], [3, 'D'] )
     .groupTuple()
     .view()
It shows:
[1, [A, B, C]]
[2, [C, A]]
[3, [B, D]]
This operator is useful to process altogether all elements for which there’s a common property or a grouping key.
Exercise
Use fromPath to create a channel emitting the fastq files matching the pattern data/ggal/*.fq,
then use a map to associate to each file the name prefix. Finally group together all
files having the same common prefix.
5.2.8. join
The join operator creates a channel that joins together the items emitted by two channels for which exits a matching key. The key is defined, by default, as the first element in each item emitted.
left = Channel.from(['X', 1], ['Y', 2], ['Z', 3], ['P', 7])
right= Channel.from(['Z', 6], ['Y', 5], ['X', 4])
left.join(right).view()
The resulting channel emits:
[Z, 3, 6]
[Y, 2, 5]
[X, 1, 4]
5.2.9. branch
The branch operator allows you to forward the items emitted by a source channel to one or more output channels, choosing one out of them at a time.
The selection criteria is defined by specifying a closure that provides one or more boolean expression, each of which is identified by a unique label. On the first expression that evaluates to a true value, the current item is bound to a named channel as the label identifier. For example:
Channel
    .from(1,2,3,40,50)
    .branch {
        small: it < 10
        large: it > 10
    }
    .set { result }

 result.small.view { "$it is small" }
result.large.view { "$it is large" }| The branch operator returns a multi-channel object i.e. a variable that holds more than one channel object. |
5.3. More resources
Check the operators documentation on Nextflow web site.
6. Groovy basic structures and idioms
Nextflow is a DSL implemented on top of the Groovy programming lang, which in turns is a super-set of the Java programming language. This means that Nextflow can run any Groovy and Java code.
6.1. Printing values
To print something is as easy as using one of the print or println methods.
println("Hello, World!")
The only difference between the two is that the println method implicitly appends a new line character to the printed string.
| parenthesis for function invocations are optional. Therefore also the following is a valid syntax. |
println "Hello, World!"
6.2. Comments
Comments use the same syntax as in the C-family programming languages:
// comment a single config file

/*
   a comment spanning
   multiple lines
 */
6.3. Variables
To define a variable, simply assign a value to it:
x = 1
println x

x = new java.util.Date()
println x

x = -3.1499392
println x

x = false
println x

x = "Hi"
println x
Local variables are defined using the def keyword:
def x = 'foo'
It should be always used when defining variables local to a function or a closure.
6.4. Lists
A List object can be defined by placing the list items in square brackets:
list = [10,20,30,40]
You can access a given item in the list with square-bracket notation (indexes start at 0) or using the get method:
assert list[0] == 10
assert list[0] == list.get(0)
In order to get the length of the list use the size method:
assert list.size() == 4
Lists can also be indexed with negative indexes and reversed ranges.
list = [0,1,2]
assert list[-1] == 2
assert list[-1..0] == list.reverse()
List objects implements all methods provided by the Java java.util.List interface plus the extension methods provided by Groovy API.
assert [1,2,3] << 1 == [1,2,3,1]
assert [1,2,3] + [1] == [1,2,3,1]
assert [1,2,3,1] - [1] == [2,3]
assert [1,2,3] * 2 == [1,2,3,1,2,3]
assert [1,[2,3]].flatten() == [1,2,3]
assert [1,2,3].reverse() == [3,2,1]
assert [1,2,3].collect{ it+3 } == [4,5,6]
assert [1,2,3,1].unique().size() == 3
assert [1,2,3,1].count(1) == 2
assert [1,2,3,4].min() == 1
assert [1,2,3,4].max() == 4
assert [1,2,3,4].sum() == 10
assert [4,2,1,3].sort() == [1,2,3,4]
assert [4,2,1,3].find{it%2 == 0} == 4
assert [4,2,1,3].findAll{it%2 == 0} == [4,2]
6.5. Maps
Maps are like lists that have an arbitrary type of key instead of integer. Therefore, the syntax is very much aligned.
map = [a:0, b:1, c:2]
Maps can be accessed in a conventional square-bracket syntax or as if the key was a property of the map.
assert map['a'] == 0     (1)
assert map.b == 1        (2)
assert map.get('c') == 2 (3)
| 1 | Use of the square brackets. |
| 2 | Use a dot notation. |
| 3 | Use of get method. |
To add data or to modify a map, the syntax is similar to adding values to list:
map['a'] = 'x'      (1)
map.b = 'y'         (2)
map.put('c', 'z')   (3)
assert map == [a:'x', b:'y', c:'z']
| 1 | Use of the square brackets. |
| 2 | Use a dot notation. |
| 3 | Use of get method. |
Maps objects implements all methods provided by the Java java.util.Map interface plus the extension methods provided by Groovy API.
6.6. String interpolation
String literals can be defined enclosing them either with single-quoted or double-quotes characters.
Double-quoted strings can contain the value of an arbitrary variable by prefixing its name with the $ character, or the value of
any expression by using the ${expression} syntax, similar to Bash/shell scripts:
foxtype = 'quick'
foxcolor = ['b', 'r', 'o', 'w', 'n']
println "The $foxtype ${foxcolor.join()} fox"

x = 'Hello'
println '$x + $y'
This code prints:
The quick brown fox
$x + $y
Note the different use of $ and ${..} syntax to interpolate value expressions in a string literal.
|
Finally string literals can also be defined using the / character as delimiter. They are known as slashy
strings and are useful for defining regular expressions and patterns, as there is no need to escape backslashes.
As with double quote strings they allow to interpolate variables prefixed with a $ character.
Try the following to see the difference:
x = /tic\tac\toe/
y = 'tic\tac\toe'

println x
println y
it prints:
tic\tac\toe
tic    ac    oe
6.7. Multi-line strings
A block of text that span multiple lines can be defined by delimiting it with triple single or double quotes:
text = """
    Hello there James
    how are you today?
    """
Finally multi-line strings can also be defined with slashy string. For example:
text = /
    This is a multi-line
    slashy string!
    It's cool, isn't it?!
    /
Like before, multi-line strings inside double quotes and slash characters support variable interpolation, while single-quoted multi-line strings do not.
6.8. If statement
The if statement uses the same syntax common other programming lang such Java, C, JavaScript, etc.
if( < boolean expression > ) {
    // true branch
}
else {
    // false branch
}
The else branch is optional. Also curly brackets are optional when the branch define just a single statement.
x = 1
if( x > 10 )
    println 'Hello'
null, empty strings and empty collections are evaluated to false.
|
Therefore a statement like:
list = [1,2,3]
if( list != null && list.size() > 0 ) {
  println list
}
else {
  println 'The list is empty'
}
Can be written as:
if( list )
    println list
else
    println 'The list is empty'
See the Groovy-Truth for details.
In some cases can be useful to replace if statement with a ternary expression aka conditional expression. For example:
|
println list ? list : 'The list is empty'
The previous statement can be further simplified using the Elvis operator as shown below:
println list ?: 'The list is empty'
6.9. For statement
The classical for loop syntax is supported as shown here:
for (int i = 0; i <3; i++) {
   println("Hello World $i")
}
Iteration over list objects is also possible using the syntax below:
list = ['a','b','c']

for( String elem : list ) {
  println elem
}
6.10. Functions
It is possible to define a custom function into a script, as shown here:
int fib(int n) {
    return n < 2 ? 1 : fib(n-1) + fib(n-2)
}

assert fib(10)==89
A function can take multiple arguments separating them with a comma. The return keyword can be omitted and the function implicitly returns the value of the last evaluated expression. Also explicit types can be omitted (thought not recommended):
def fact( n ) {
  n > 1 ? n * fact(n-1) : 1
}

assert fact(5) == 120
6.11. Closures
Closures are the swiss army knife of Nextflow/Groovy programming. In a nutshell a closure is is a block of code that can be passed as an argument to a function, it could also be defined an anonymous function.
More formally, a closure allows the definition of functions as first class objects.
square = { it * it }
The curly brackets around the expression it * it tells the script interpreter to treat this expression as code.
The it identifier is an implicit variable that represents the value that is passed to the function when it is invoked.
Once compiled the function object is assigned to the variable square as any other variable assignments shown previously.
To invoke the closure execution use the special method call or just use the round parentheses to specify the closure parameter(s).
For example:
assert square.call(5) == 25
assert square(9) == 81
This is not very interesting until we find that we can pass the function square as an argument to other functions or methods.
Some built-in functions take a function like this as an argument. One example is the collect method on lists:
x = [ 1, 2, 3, 4 ].collect(square)
println x
It prints:
[ 1, 4, 9, 16 ]
By default, closures take a single parameter called it, to give it a different name use the → syntax. For example:
square = { num -> num * num }
It’s also possible to define closures with multiple, custom-named parameters.
For example, the method each() when applied to a map can take a closure with two arguments, to which it passes the key-value
pair for each entry in the map object. For example:
printMap = { a, b -> println "$a with value $b" }
values = [ "Yue" : "Wu", "Mark" : "Williams", "Sudha" : "Kumari" ]
values.each(printMap)
It prints:
Yue with value Wu
Mark with value Williams
Sudha with value Kumari
A closure has two other important features. First, it can access and modify variables in the scope where it is defined.
Second, a closure can be defined in an anonymous manner, meaning that it is not given a name, and is defined in the place where it needs to be used.
As an example showing both these features, see the following code fragment:
result = 0  (1)
values = ["China": 1 , "India" : 2, "USA" : 3] (2)
values.keySet().each { result += values[it] }  (3)
println result
| 1 | Define a global variable. |
| 2 | Define a map object. |
| 3 | Invoke the each method passing closure object which modifies the result variable. |
Learn more about closures in the Groovy documentation.
6.12. More resources
The complete Groovy language documentation is available at this link.
A great resource to master Apache Groovy syntax is Groovy in Action.
7. Simple Rna-Seq pipeline
During this tutorial you will implement a proof of concept of a RNA-Seq pipeline which:
-
Indexes a trascriptome file.
-
Performs quality controls
-
Performs quantification.
-
Create a MultiqQC report.
7.1. Define the pipeline parameters
The script script1.nf defines the pipeline input parameters.
params.reads = "$baseDir/data/ggal/*_{1,2}.fq"
params.transcriptome = "$baseDir/data/ggal/transcriptome.fa"
params.multiqc = "$baseDir/multiqc"

println "reads: $params.reads"
Run it by using the following command:
nextflow run script1.nfTry to specify a different input parameter, for example:
nextflow run script1.nf --reads this/and/that7.1.1. Exercise
Modify the script1.nf adding a fourth parameter named outdir and set it to a default path
that will be used as the pipeline output directory.
7.1.2. Exercise
Modify the script1.nf to print all the pipeline parameters by using a single log.info command and a multiline string statement.
| see an example here. |
7.1.3. Recap
In this step you have learned:
-
How to define parameters in your pipeline script
-
How to pass parameters by using the command line
-
The use of
$varand${var}variable placeholders -
How to use multiline strings
-
How to use
log.infoto print information and save it in the log execution file
7.2. Create transcriptome index file
Nextflow allows the execution of any command or user script by using a process definition.
A process is defined by providing three main declarations: the process inputs, the process outputs and finally the command script.
The second example adds the index process.
/*
 * pipeline input parameters
 */
params.reads = "$baseDir/data/ggal/*_{1,2}.fq"
params.transcriptome = "$baseDir/data/ggal/transcriptome.fa"
params.multiqc = "$baseDir/multiqc"
params.outdir = "results"

log.info """\
         R N A S E Q - N F   P I P E L I N E
         ===================================
         transcriptome: ${params.transcriptome}
         reads        : ${params.reads}
         outdir       : ${params.outdir}
         """
         .stripIndent()

/*
 * define the `index` process that create a binary index
 * given the transcriptome file
 */
process index {

    input:
    path transcriptome from params.transcriptome

    output:
    path 'index' into index_ch

    script:
    """
    salmon index --threads $task.cpus -t $transcriptome -i index
    """
}
It takes the transcriptome file as input and creates the transcriptome index by using the salmon tool.
Note how the input declaration defines a transcriptome variable in the process context
that it is used in the command script to reference that file in the Salmon command line.
Try to run it by using the command:
nextflow run script2.nfThe execution will fail because Salmon is not installed in your environment.
Add the command line option -with-docker to launch the execution through a Docker container
as shown below:
nextflow run script2.nf -with-dockerThis time it works because it uses the Docker container nextflow/rnaseq-nf defined in the
nextflow.config file.
In order to avoid to add the option -with-docker add the following line in the nextflow.config file:
docker.enabled = true7.2.1. Exercise
Enable the Docker execution by default adding the above setting in the nextflow.config file.
7.2.2. Exercise
Print the output of the index_ch channel by using the view
operator.
7.2.3. Exercise
Use the command tree work to see how Nextflow organises the process work directory.
7.2.4. Recap
In this step you have learned:
-
How to define a process executing a custom command
-
How process inputs are declared
-
How process outputs are declared
-
How to access the number of available CPUs
-
How to print the content of a channel
7.3. Collect read files by pairs
This step shows how to match read files into pairs, so they can be mapped by Salmon.
Edit the script script3.nf and add the following statement as the last line:
read_pairs_ch.view()Save it and execute it with the following command:
nextflow run script3.nfIt will print an output similar to the one shown below:
[ggal_gut, [/.../data/ggal/gut_1.fq, /.../data/ggal/gut_2.fq]]
The above example shows how the read_pairs_ch channel emits tuples composed by
two elements, where the first is the read pair prefix and the second is a list
representing the actual files.
Try it again specifying different read files by using a glob pattern:
nextflow run script3.nf --reads 'data/ggal/*_{1,2}.fq'
File paths including one or more wildcards ie. *, ?, etc. MUST be
wrapped in single-quoted characters to avoid Bash expands the glob.
|
7.3.1. Exercise
Use the set operator in place
of = assignment to define the read_pairs_ch channel.
7.3.2. Exercise
Use the checkIfExists option from the fromFilePairs method
to check if the specified path contains at least a file pair.
7.3.3. Recap
In this step you have learned:
-
How to use
fromFilePairsto handle read pair files -
How to use the
setoperator to define a new channel variable -
How to use the
checkIfExistsoption to check input file existence
7.4. Perform expression quantification
The script script4.nf adds the quantification process.
In this script note as the index_ch channel, declared as output in the index process,
is now used as a channel in the input section.
Also note as the second input is declared as a tuple composed by two elements:
the pair_id and the reads in order to match the structure of the items emitted
by the read_pairs_ch channel.
Execute it by using the following command:
nextflow run script4.nf -resumeYou will see the execution of the quantification process.
The -resume option cause the execution of any step that has been already processed to be skipped.
Try to execute it with more read files as shown below:
nextflow run script4.nf -resume --reads 'data/ggal/*_{1,2}.fq'You will notice that the quantification process is executed more than
one time.
Nextflow parallelizes the execution of your pipeline simply by providing multiple input data to your script.
7.4.1. Exercise
Add a tag directive to the
quantification process to provide a more readable execution log.
7.4.2. Exercise
Add a publishDir directive
to the quantification process to store the process results into a directory of your choice.
7.4.3. Recap
In this step you have learned:
-
How to connect two processes by using the channel declarations
-
How to resume the script execution skipping already computed steps
-
How to use the
tagdirective to provide a more readable execution output -
How to use the
publishDirto store a process results in a path of your choice
7.5. Quality control
This step implements a quality control of your input reads. The inputs are the same
read pairs which are provided to the quantification steps
You can run it by using the following command:
nextflow run script5.nf -resumeThe script will report the following error message:
Channel `read_pairs_ch` has been used twice as an input by process `fastqc` and process `quantification`
7.5.1. Exercise
Modify the creation of the read_pairs_ch channel by using a into
operator in place of a set.
| see an example here. |
7.5.2. Recap
In this step you have learned:
-
How to use the
intooperator to create multiple copies of the same channel
7.6. MultiQC report
This step collect the outputs from the quantification and fastqc steps to create
a final report by using the MultiQC tool.
Execute the script with the following command:
nextflow run script6.nf -resume --reads 'data/ggal/*_{1,2}.fq'It creates the final report in the results folder in the current work directory.
In this script note the use of the mix
and collect operators chained
together to get all the outputs of the quantification and fastqc process as a single
input.
7.6.1. Recap
In this step you have learned:
-
How to collect many outputs to a single input with the
collectoperator -
How to
mixtwo channels in a single channel -
How to chain two or more operators together
7.7. Handle completion event
This step shows how to execute an action when the pipeline completes the execution.
Note that Nextflow processes define the execution of asynchronous tasks i.e. they are not executed one after another as they are written in the pipeline script as it would happen in a common imperative programming language.
The script uses the workflow.onComplete event handler to print a confirmation message
when the script completes.
workflow.onComplete {
    println ( workflow.success ? "\nDone! Open the following report in your browser -->  $params.outdir/multiqc_report.html\n" : "Oops .. something went wrong" )
}
Try to run it by using the following command:
nextflow run script7.nf -resume --reads 'data/ggal/*_{1,2}.fq'7.8. Custom scripts
Real world pipelines use a lot of custom user scripts (BASH, R, Python, etc). Nextflow
allows you to use and manage all these scripts in consistent manner. Simply put them
in a directory named bin in the pipeline project root. They will be automatically added
to the pipeline execution PATH.
For example, create a file named fastqc.sh with the following content:
#!/bin/bash
set -e
set -u

sample_id=${1}
reads=${2}

mkdir fastqc_${sample_id}_logs
fastqc -o fastqc_${sample_id}_logs -f fastq -q ${reads}
Save it, give execute permission and move it in the bin directory as shown below:
chmod +x fastqc.sh
mkdir -p bin
mv fastqc.sh bin
Then, open the script7.nf file and replace the fastqc process' script with
the following code:
script:
"""
fastqc.sh "$sample_id" "$reads"
"""
Run it as before:
nextflow run script7.nf -resume --reads 'data/ggal/*_{1,2}.fq'7.8.1. Recap
In this step you have learned:
-
How to write or use existing custom script in your Nextflow pipeline.
-
How to avoid the use of absolute paths having your scripts in the
bin/project folder.
7.9. Metrics and reports
Nextflow is able to produce multiple reports and charts providing several runtime metrics and execution information.
Run the rnaseq-nf pipeline previously introduced as shown below:
nextflow run rnaseq-nf -with-docker -with-report -with-trace -with-timeline -with-dag dag.pngThe -with-report option enables the creation of the workflow execution report. Open the file report.html with a browser to see the report created with the above command.
The -with-trace option enables the create of a tab separated file containing runtime information for each executed task. Check the content of the file trace.txt for an example.
The -with-timeline option enables the creation of the workflow timeline report showing how processes where executed along time. This may
be useful to identify most time consuming tasks and bottlenecks. See an example at this link.
Finally the -with-dag option enables to rendering of the workflow execution direct acyclic graph representation.
Note: this feature requires the installation of Graphviz in your computer.
See here for details.
Note: runtime metrics may be incomplete for run short running tasks as in the case of this tutorial.
| You view the HTML files right-clicking on the file name in the left side-bar and choosing the Preview menu item. |
7.10. Mail notification
Send a notification email when the workflow execution complete using the -N <email address>
command line option. Execute again the previous example specifying your email address:
nextflow run script7.nf -resume --reads 'data/ggal/*_{1,2}.fq' -N <your email>
Your computer must have installed a pre-configured mail tool, such as mail or sendmail.
|
Alternatively you can provide the settings of the STMP server needed to send the mail notification in the Nextflow config file. See mail documentation for details.
7.11. Run a project from GitHub
Nextflow allows the execution of a pipeline project directly from a GitHub repository (or similar services eg. BitBucket and GitLab).
This simplifies the sharing and the deployment of complex projects and tracking changes in a consistent manner.
The following GitHub repository hosts a complete version of the workflow introduced in this tutorial:
You can run it by specifying the project name as shown below:
nextflow run nextflow-io/rnaseq-nf -with-dockerIt automatically downloads it and store in the $HOME/.nextflow folder.
Use the command info to show the project information, e.g.:
nextflow info nextflow-io/rnaseq-nfNextflow allows the execution of a specific revision of your project by using the -r command line option. For Example:
nextflow run nextflow-io/rnaseq-nf -r devRevision are defined by using Git tags or branches defined in the project repository.
This allows a precise control of the changes in your project files and dependencies over time.
7.12. More resources
-
Nextflow documentation - The Nextflow docs home.
-
Nextflow patterns - A collection of Nextflow implementation patterns.
-
CalliNGS-NF - A Variant calling pipeline implementing GATK best practices.
-
nf-core - A community collection of production ready genomic pipelines.
8. Manage dependencies & containers
Computational workflows rarely are composed by as single script or tool. Most of the times they require the usage of dozens of different software components or libraries.
Installing and maintaining such dependencies is a challenging task and the most common source of irreproducibility in scientific applications.
Containers are exceptionally useful in scientific workflows. They allow the encapsulation of software dependencies, i.e. tools and libraries required by a data analysis application in one or more self-contained, ready-to-run, immutable container images that can be easily deployed in any platform supporting the container runtime.
8.1. Docker hands-on
Get practice with basic Docker commands to pull, run and build your own containers.
A container is a ready-to-run Linux environment which can be executed in an isolated manner from the hosting system. It has own copy of the file system, processes space, memory management, etc.
Containers are a Linux feature known as Control Groups or Cgroups introduced with kernel 2.6.
Docker adds to this concept an handy management tool to build, run and share container images.
These images can be uploaded and published in a centralised repository know as Docker Hub, or hosted by other parties like for example Quay.
8.1.1. Run a container
Run a container is easy as using the following command:
docker run <container-name>For example:
docker run hello-world8.1.2. Pull a container
The pull command allows you to download a Docker image without running it. For example:
docker pull debian:stretch-slimThe above command download a Debian Linux image.
8.1.3. Run a container in interactive mode
Launching a BASH shell in the container allows you to operate in an interactive mode in the containerised operating system. For example:
docker run -it debian:jessie-slim bashOnce launched the container you wil noticed that’s running as root (!). Use the usual commands to navigate in the file system.
To exit from the container, stop the BASH session with the exit command.
8.1.4. Your first Dockerfile
Docker images are created by using a so called Dockerfile i.e. a simple text file
containing a list of commands to be executed to assemble and configure the image
with the software packages required.
In this step you will create a Docker image containing the Salmon tool.
Warning: the Docker build process automatically copies all files that are located in the
current directory to the Docker daemon in order to create the image. This can take
a lot of time when big/many files exist. For this reason it’s important to always work in
a directory containing only the files you really need to include in your Docker image.
Alternatively you can use the .dockerignore file to select the path to exclude from the build.
Then use your favourite editor eg. vim to create a file named Dockerfile and copy the
following content:
FROM debian:jessie-slim

MAINTAINER <your name>

RUN apt-get update && apt-get install -y curl cowsay

ENV PATH=$PATH:/usr/games/
When done save the file.
8.1.5. Build the image
Build the Docker image by using the following command:
docker build -t my-image .Note: don’t miss the dot in the above command. When it completes, verify that the image has been created listing all available images:
docker imagesYou can try your new container by running this command:
docker run my-image cowsay Hello Docker!8.1.6. Add a software package to the image
Add the Salmon package to the Docker image by adding to the Dockerfile the following snippet:
RUN curl -sSL https://github.com/COMBINE-lab/salmon/releases/download/v0.8.2/Salmon-0.8.2_linux_x86_64.tar.gz | tar xz \
 && mv /Salmon-*/bin/* /usr/bin/ \
 && mv /Salmon-*/lib/* /usr/lib/
Save the file and build again the image with the same command as before:
docker build -t my-image .You will notice that it creates a new Docker image with the same name but with a different image ID.
8.1.7. Run Salmon in the container
Check that everything is fine running Salmon in the container as shown below:
docker run my-image salmon --versionYou can even launch a container in an interactive mode by using the following command:
docker run -it my-image bashUse the exit command to terminate the interactive session.
8.1.8. File system mounts
Create an genome index file by running Salmon in the container.
Try to run Salmon in the container with the following command:
docker run my-image \
  salmon index -t $PWD/data/ggal/transcriptome.fa -i index
The above command fails because Salmon cannot access the input file.
This happens because the container runs in a complete separate file system and it cannot access the hosting file system by default.
You will need to use the --volume command line option to mount the input file(s) eg.
docker run --volume $PWD/data/ggal/transcriptome.fa:/transcriptome.fa my-image \
  salmon index -t /transcriptome.fa -i index
the generated transcript-index directory is still not accessible in the host file system (and actually it went lost).
|
| An easier way is to mount a parent directory to an identical one in the container, this allows you to use the same path when running it in the container eg. |
docker run --volume $HOME:$HOME --workdir $PWD my-image \
  salmon index -t $PWD/data/ggal/transcriptome.fa -i index
Check the content of the transcript-index folder entering the command:
| Note that the permissions for files created by the Docker execution is root. |
Exercise
Use the option -u $(id -u):$(id -g) to allow Docker to create files with the right permission.
8.1.9. Upload the container in the Docker Hub (bonus)
Publish your container in the Docker Hub to share it with other people.
Create an account in the hub.docker.com web site. Then from your shell terminal run the following command, entering the user name and password you specified registering in the Hub:
docker loginTag the image with your Docker user name account:
docker tag my-image <user-name>/my-imageFinally push it to the Docker Hub:
docker push <user-name>/my-imageAfter that anyone will be able to download it by using the command:
docker pull <user-name>/my-imageNote how after a pull and push operation, Docker prints the container digest number e.g.
Digest: sha256:aeacbd7ea1154f263cda972a96920fb228b2033544c2641476350b9317dab266
Status: Downloaded newer image for nextflow/rnaseq-nf:latest
This is a unique and immutable identifier that can be used to reference container image in a univocally manner. For example:
docker pull nextflow/rnaseq-nf@sha256:aeacbd7ea1154f263cda972a96920fb228b2033544c2641476350b9317dab2668.1.10. Run a Nextflow script using a Docker container
The simplest way to run a Nextflow script with a Docker image is using the -with-docker command line option:
nextflow run script2.nf -with-docker my-imageWe’ll see later how to configure in the Nextflow config file which container to use instead of having to specify every time as a command line argument.
8.2. Singularity
Singularity is container runtime designed to work in HPC data center, where the usage of Docker is generally not allowed due to security constraints.
Singularity implements a container execution model similarly to Docker however it uses a complete different implementation design.
A Singularity container image is archived as a plain file that can be stored in a shared file system and accessed by many computing nodes managed by a batch scheduler.
8.2.1. Create a Singularity image
Singularity images are created using a Singularity file in similar manner to Docker, though using a different syntax.

Bootstrap: docker
From: debian:stretch-slim

%environment
export PATH=$PATH:/usr/games/

%labels
AUTHOR <your name>

%post

apt-get update && apt-get install -y locales-all curl cowsay
curl -sSL https://github.com/COMBINE-lab/salmon/releases/download/v1.0.0/salmon-1.0.0_linux_x86_64.tar.gz | tar xz \
 && mv /salmon-*/bin/* /usr/bin/ \
 && mv /salmon-*/lib/* /usr/lib/
Once you have save the Singularity file. Create the image with these commands:
sudo singularity build my-image.sif SingularityNote: the build command requires sudo permissions. A common workaround consists to build the image on a local
workstation and then deploy in the cluster just copying the image file.
8.2.2. Running a container
Once done, you can run your container with the following command
singularity exec my-image.sif cowsay 'Hello Singularity'By using the shell command you can enter in the container in interactive mode. For example:
singularity shell my-image.sifOnce in the container instance run the following commands:
touch hello.txt
ls -la
Note how the files on the host environment are shown. Singularity automatically mounts the host $HOME directory and uses the current work directory.
|
8.2.3. Import a Docker image
An easier way to create Singularity container without requiring sudo permission and boosting the containers interoperability is to import a Docker container image pulling it directly from a Docker registry. For example:
singularity pull docker://debian:stretch-slimThe above command automatically download the Debian Docker image and converts it to a Singularity image store in the current directory with the name debian-jessie.simg.
8.2.4. Run a Nextflow script using a Singularity container
Nextflow allows the transparent usage of Singularity containers as easy as with Docker ones.
It only requires to enable the use of Singularity engine in place of Docker in the Nextflow configuration file using the -with-singularity command line option:
nextflow run script7.nf -with-singularity nextflow/rnaseq-nfAs before the Singularity container can also be provided in the Nextflow config file. We’ll see later how to do it.
8.2.5. The Singularity Container Library
The authors of Singularity, SyLabs have their own repository of Singularity containers.
In the same way that we can push docker images to Docker Hub, we can upload Singularity images to the Singularity Library.
8.2.6. Conda/Bioconda packages
Conda is popular package and environment manager. The built-in support for Conda allows Nextflow pipelines to automatically creates and activates the Conda environment(s) given the dependencies specified by each process.
A Conda environment is defined using a YAML file which lists the required software packages. For example:
name: nf-tutorial
channels:
  - defaults
  - bioconda
  - conda-forge
dependencies:
  - salmon=1.0.0
  - fastqc=0.11.5
  - multiqc=1.5
Given the recipe file, the environment is created using the command shown below:
conda env create --file env.ymlYou can check the environment was created successfully with the command shown below:
conda env listTo enable the environment you can use the activate command:
conda activate nf-tutorialNextflow is able to manage the activation of a Conda environment when the its directory is specified using the -with-conda option. For example:
nextflow run script7.nf -with-conda /home/ubuntu/miniconda2/envs/nf-tutorial| When specifying as Conda environment a YAML recipe file, Nextflow automatically downloads the required dependencies, build the environment and automatically activate it. |
This makes easier to manage different environments for the processes in the workflow script.
See the Nextflow in the Nextflow documentation for details.
8.2.7. Bonus Exercise
Take a look at the Dockerfile of the rnaseq-nf pipeline to determine how it is built.
8.2.8. BioContainers
Another useful resource linking together Bioconda and containers is the BioContainers project. BioContainers is a community initiative that provides a registry of container images for every Bioconda recipe.
9. Configuration file
When a pipeline script is launched Nextflow looks for a file named nextflow.config in the current directory
and in the script base directory (if it is not the same as the current directory).
Finally it checks for the file $HOME/.nextflow/config.
When more than one on the above files exist they are merged, so that the settings in the first override the same ones that may appear in the second one, and so on.
The default config file search mechanism can be extended proving an extra configuration
file by using the command line option -c <config file>.
9.1. Config syntax
name = value
Please note, string values need to be wrapped in quotation characters while numbers and boolean values
(true, false) do not. Also note that values are typed, meaning for example that, 1 is different from '1',
since the first is interpreted as the number one, while the latter is interpreted as a string value.
|
9.2. Config variables
Configuration properties can be used as variables in the configuration file itself, by using the usual
$propertyName or ${expression} syntax.
propertyOne = 'world'
anotherProp = "Hello $propertyOne"
customPath = "$PATH:/my/app/folder"
In the configuration file it’s possible to access any variable defined in the host environment such
as $PATH, $HOME, $PWD, etc.
|
9.3. Config comments
Configuration files use the same conventions for comments used in the Nextflow script:
// comment a single config file

/*
   a comment spanning
   multiple lines
 */
9.4. Config scopes
Configuration settings can be organized in different scopes by dot prefixing the property names with a scope identifier or grouping the properties in the same scope using the curly brackets notation. This is shown in the following example:
alpha.x  = 1
alpha.y  = 'string value..'

beta {
    p = 2
    q = 'another string ..'
}
9.5. Config params
The scope params allows the definition of workflow parameters that overrides the values defined in the main workflow script.
This is useful to consolidate one or more execution parameters in a separate file.
// config file
params.foo = 'Bonjour'
params.bar = 'le monde!'
// workflow script
params.foo = 'Hello'
params.bar = 'world!'
// print the both params
println "$params.foo $params.bar"Exercise
Save the first snippet as nextflow.config and the second one as params.nf. Then run:
nextflow run params.nfExecute is again specifying the foo parameter on the command line:
nextflow run params.nf --foo HolaCompare the result of the two executions.
9.6. Config env
The env scope allows the definition one or more variable that will be exported in the environment
where the workflow tasks will be executed.
env.ALPHA = 'some value'
env.BETA = "$HOME/some/path"
Exercise
Save the above snippet a file named my-env.config. The save the snippet below in a file named foo.nf:
process foo {
  echo true
  '''
  env | egrep 'ALPHA|BETA'
  '''
}
Finally executed the following command:
nextflow run foo.nf -c my-env.config9.7. Config process
The process directives allow the specification of specific settings for
the task execution such as cpus, memory, container and other resources in the pipeline script.
This is useful specially when prototyping a small workflow script.
However it’s always a good practice to decouple the workflow execution logic from the process configuration settings, i.e. it’s strongly suggested to define the process settings in the workflow configuration file instead of the workflow script.
The process configuration scope allows the setting of any process directives
in the Nextflow configuration file. For example:
process {
    cpus = 10
    memory = 8.GB
    container = 'biocontainers/bamtools:v2.4.0_cv3'
}
The above config snippet defines the cpus, memory and container directives for all processes in your workflow script.
The process selector can be used to apply the configuration to a specific process or group of processes (discussed later).
| Memory and time duration unit can be specified either using a string based notation in which the digit(s) and the unit can be separated by a blank or by using the numeric notation in which the digit(s) and the unit are separated by a dot character and it’s not enclosed by quote characters. |
| String syntax | Numeric syntax | Value |
|---|---|---|
'10 KB' |
10.KB |
10240 bytes |
'500 MB' |
500.MB |
524288000 bytes |
'1 min' |
1.min |
60 seconds |
'1 hour 25 sec' |
- |
1 hour and 25 seconds |
INFO: The syntax for setting process directives in the configuration file requires = ie. assignment operator,
instead it should not be used when setting process directives in the workflow script.
This important especially when you want to define a config setting using a dynamic expression using a closure. For example:
process {
    memory = { 4.GB * task.cpus }
}
Directives that requires more than one value, e.g. pod, in the configuration file need to be expressed as a map object.
process {
    pod = [env: 'FOO', value: '123']
}
Finally directives that allows to be repeated in the process definition, in the configuration files need to be defined as a list object. For example:
process {
    pod = [ [env: 'FOO', value: '123'],
            [env: 'BAR', value: '456'] ]
}
9.7.1. Config Docker execution
The container image to be used for the process execution can be specified in the nextflow.config file:
process.container = 'nextflow/rnaseq-nf'
docker.enabled = true| The use of the unique SHA256 image ID guarantees that the image content do not change over time |
process.container = 'nextflow/rnaseq-nf@sha256:aeacbd7ea1154f263cda972a96920fb228b2033544c2641476350b9317dab266'
docker.enabled = true
9.7.2. Config Singularity execution
The run the workflow execution with a Singularity container provide the container image file path in the Nextflow config file using the container directive:
process.container = '/some/singularity/image.sif'
singularity.enabled = true
The container image file must be an absolute path i.e. it must start with a /.
|
The following protocols are supported:
-
library://download the container image from the Singularity Library service. -
shub://download the container image from the Singularity Hub. -
docker://download the container image from the Docker Hub and convert it to the Singularity format. -
docker-daemon://pull the container image from a local Docker installation and convert it to a Singularity image file.
| Specifying a plain Docker container image name, Nextflow implicitly download and converts it to a Singularity image when the Singularity execution is enabled. For example: |
process.container = 'nextflow/rnaseq-nf'
singularity.enabled = true
The above configuration instructs Nextflow to use Singularity engine to run your script processes. The container is pulled from the Docker registry and cached in the current directory to be used for further runs.
Alternatively if you have a Singularity image file, its location absolute path can be specified as the container name either
using the -with-singularity option or the process.container setting in the config file.
Try to run the script as shown below:
nextflow run script7.nfNote: Nextflow will pull the container image automatically, it will require a few seconds depending the network connection speed.
9.8. Config Conda execution
The use of a Conda environment can also be provided in the configuration file adding the following setting in the nextflow.config file:
process.conda = "/home/ubuntu/miniconda2/envs/nf-tutorial"You can either specify the path of an existing Conda environment directory or the path of Conda environment YAML file.
10. Deployment scenarios
Real world genomic application can spawn the execution of thousands of jobs. In this scenario a batch scheduler is commonly used to deploy a pipeline in a computing cluster, allowing the execution of many jobs in parallel across many computing nodes.
Nextflow has built-in support for most common used batch schedulers such as Univa Grid Engine and SLURM and IBM LSF among others. Check the Nextflow documentation for the complete list of supported execution platforms.
10.1. Cluster deployment
A key Nextflow feature is the ability to decouple the workflow implementation from the actual execution platform implementing an abstraction layer that allows the deployment of the resulting workflow on any executing platform support by the framework.

To run your pipeline with a batch scheduler modify the nextflow.config file specifying the target executor and the required computing resources if needed. For example:
process.executor = 'slurm'10.2. Managing cluster resources
When using a batch scheduler is generally needed to specify the amount of resources i.e. cpus, memory, execution time, etc. required by each task.
This can be done using the following process directives:
the cluster queue to be used for the computation |
|
the number of cpus to be allocated a task execution |
|
the amount of memory to be allocated a task execution |
|
the max amount of time to be allocated a task execution |
|
the amount of disk storage required a task execution |
10.2.1. Workflow wide resources
Use the scope process to define the resource requirements for all processes in your workflow applications. For example:
process {
    executor = 'slurm'
    queue = 'short'
    memory = '10 GB'
    time = '30 min'
    cpus = 4
}
10.2.2. Configure process by name
In real world application different tasks need different amount of computing resources. It is possible to define the resources for a specific task using the select withName: followed by the process name:
process {
    executor = 'slurm'
    queue = 'short'
    memory = '10 GB'
    time = '30 min'
    cpus = 4

    withName: foo {
        cpus = 4
        memory = '20 GB'
        queue = 'short'
    }

    withName: bar {
        cpus = 8
        memory = '32 GB'
        queue = 'long'
    }
}
10.2.3. Configure process by labels
When a workflow application is composed by many processes can be overkill listing all process names in the configuration file to specifies the resources for each of them.
A better strategy consist to annotate the processes with a label directive. Then specify the resources in the configuration file using for all processes having the same label.
The workflow script:
process task1 {
  label 'long'

  """
  first_command --here
  """
}

process task2 {
  label 'short'

  """
  second_command --here
  """
}
The configuration file:
process {
    executor = 'slurm'

    withLabel: 'short' {
        cpus = 4
        memory = '20 GB'
        queue = 'alpha'
    }

    withLabel: 'long' {
        cpus = 8
        memory = '32 GB'
        queue = 'omega'
    }
}
10.2.4. Configure multiple containers
It is possible to use a different container for each process in your workflow. For having a workflow script defining two process, it’s possible to define a config file as shown below:
process {
  withName: foo {
    container = 'some/image:x'
  }
  withName: bar {
    container = 'other/image:y'
  }
}

docker.enabled = true| A single fat container or many slim containers? Both approaches have pros & cons. A single container is simpler to build and to maintain, however when using many tools the image can become very big and tools can conflict each other. Using a container for each process can result in many different images to build and to maintain, especially when processes in your workflow uses different tools in each task. |
Read more about config process selector at this link.
10.3. Configuration profiles
Configuration files can contain the definition of one or more profiles. A profile is a set of configuration attributes that can be activated/chosen when launching a pipeline execution by using the -profile command line option.
Configuration profiles are defined by using the special scope profiles which group the attributes that belong to the same profile using a common prefix. For example:
profiles {

    standard {
        params.genome = '/local/path/ref.fasta'
        process.executor = 'local'
    }

    cluster {
        params.genome = '/data/stared/ref.fasta'
        process.executor = 'sge'
        process.queue = 'long'
        process.memory = '10GB'
        process.conda = '/some/path/env.yml'
    }

    cloud {
        params.genome = '/data/stared/ref.fasta'
        process.executor = 'awsbatch'
        process.container = 'cbcrg/imagex'
        docker.enabled = true
    }

}
This configuration defines three different profiles: standard, cluster and cloud that set different process configuration strategies depending on the target runtime platform. By convention the standard profile is implicitly used when no other profile is specified by the user.
To enable a specific profile use -profile option followed by the profile name:
nextflow run <your script> -profile cluster| Two or more configuration profiles can be specified by separating the profile names with a comma character: |
nextflow run <your script> -profile standard,cloud10.4. Cloud deployment
AWS Batch is a managed computing service that allows the execution of containerised workloads in the Amazon cloud infrastructure.
Nextflow provides a built-in support for AWS Batch which allows the seamless deployment of a Nextflow pipeline in the cloud offloading the process executions as Batch jobs.
Once the Batch environment is configured specifying the instance types to be used and the max number of cpus to be allocated, you need to created a Nextflow configuration file like the one showed below:
process.executor = 'awsbatch'      (1)
process.queue = 'cbcrg'      (2)
process.container = 'nextflow/rnaseq-nf:latest'        (3)
workDir = 's3://cbcrg/work/' (4)
aws.region = 'eu-west-1'           (5)
aws.batch.cliPath = '/home/ec2-user/miniconda/bin/aws' (6)| 1 | Set the AWS Batch as the executor to run the processes in the workflow |
| 2 | The name of the computing queue defined in the Batch environment <3>The Docker container image to be used to run each job <4>The workflow work directory must be a AWS S3 bucket <5>The AWS region to be used <6>The path of the AWS cli tool required to download/upload files to/from the container |
| The best practices is to keep this setting as a separate profile in your workflow config file. This allows the execution with a simple command. |
nextflow run script7.nfThe complete details about AWS Batch deployment are available at this link.
10.5. Volume mounts
EBS volumes (or other supported storage) can be mounted in the job container using the following configuration snippet:
aws {
  batch {
      volumes = '/some/path'
  }
}
Multiple volumes can be specified using comma-separated paths. The usual Docker volume mount syntax can be used to define complex volumes for which the container paths is different from the host paths or to specify a read-only option:
aws {
  region = 'eu-west-1'
  batch {
      volumes = ['/tmp', '/host/path:/mnt/path:ro']
  }
}
IMPORTANT:
-
This is a global configuration that has to be specified in a Nextflow config file, as such it’s applied to all process executions.
-
Nextflow expects those paths to be available. It does not handle the provision of EBS volumes or other kind of storage.
10.6. Custom job definition
Nextflow automatically creates the Batch Job definitions needed to execute your pipeline processes. Therefore it’s not required to define them before run your workflow.
However, you may still need to specify a custom Job Definition to provide fine-grained control of the configuration settings of a specific job e.g. to define custom mount paths or other special settings of a Batch Job.
To use your own job definition in a Nextflow workflow, use it in place of the container image name, prefixing it with the job-definition:// string. For example:
process {
    container = 'job-definition://your-job-definition-name'
}
10.7. Custom image
Since Nextflow requires the AWS CLI tool to be accessible in the computing environment a common solution consists of creating a custom AMI and install it in a self-contained manner e.g. using Conda package manager.
| When creating your custom AMI for AWS Batch, make sure to use the Amazon ECS-Optimized Amazon Linux AMI as the base image. |
The following snippet shows how to install AWS CLI with Miniconda:
sudo yum install -y bzip2 wget
wget https://repo.continuum.io/miniconda/Miniconda3-latest-Linux-x86_64.sh
bash Miniconda3-latest-Linux-x86_64.sh -b -f -p $HOME/miniconda
$HOME/miniconda/bin/conda install -c conda-forge -y awscli
rm Miniconda3-latest-Linux-x86_64.sh
The aws tool will be placed in a directory named bin in the main installation folder. Modifying this directory structure, after the installation, this will cause the tool not to work properly.
|
Finally specify the aws full path in the Nextflow config file as show below:
aws.batch.cliPath = '/home/ec2-user/miniconda/bin/aws'10.8. Launch template
An alternative to is to create a custom AMI using a Launch template that installs the AWS CLI tool during the instance boot via a custom user-data.
In the EC2 dashboard create a Launch template specifying in the user data field:
MIME-Version: 1.0
Content-Type: multipart/mixed; boundary="//"

--//
Content-Type: text/x-shellscript; charset="us-ascii"

#!/bin/sh
## install required deps
set -x
export PATH=/usr/local/bin:$PATH
yum install -y jq python27-pip sed wget bzip2
pip install -U boto3

## install awscli
USER=/home/ec2-user
wget -q https://repo.continuum.io/miniconda/Miniconda3-latest-Linux-x86_64.sh
bash Miniconda3-latest-Linux-x86_64.sh -b -f -p $USER/miniconda
$USER/miniconda/bin/conda install -c conda-forge -y awscli
rm Miniconda3-latest-Linux-x86_64.sh
chown -R ec2-user:ec2-user $USER/miniconda

--//--
Then in the Batch dashboard create a new compute environment and specify the newly created launch template in the corresponding field.
10.9. Hybrid deployments
Nextflow allows the use of multiple executors in the same workflow application. This feature enables the deployment of hybrid workloads in which some jobs are execute in the local computer or local computing cluster and some jobs are offloaded to AWS Batch service.
To enable this feature use one or more process selectors in your Nextflow configuration file to apply the AWS Batch configuration only to a subset of processes in your workflow. For example:
process {
    executor = 'slurm' (1)
    queue = 'short'    (2)

    withLabel: bigTask {         (3)
      executor = 'awsbatch'      (4)
      queue = 'my-batch-queue'   (5)
      container = 'my/image:tag' (6)
  }
}

aws {
    region = 'eu-west-1' (7)
}| 1 | Set slurm as the default executor |
| 2 | Set the queue for the SLURM cluster |
| 3 | Setting of for the process named bigTask |
| 4 | Set awsbatch as executor for the bigTask process |
| 5 | Set the queue for the for the bigTask process |
| 6 | set the container image to deploy the bigTask process |
| 7 | Defines the region for Batch execution |
11. Execution cache and resume
Nextflow caching mechanism works assigning a unique ID to each task which is used to create a separate execution directory where the tasks are executed and the results stored.
The task unique ID is generated as a 128-bit hash number obtained composing the task inputs values and files and the command string.
The pipeline work directory is organized as shown below:
work/
├── 12
│   └── 1adacb582d2198cd32db0e6f808bce
│       ├── genome.fa -> /data/../genome.fa
│       └── index
│           ├── hash.bin
│           ├── header.json
│           ├── indexing.log
│           ├── quasi_index.log
│           ├── refInfo.json
│           ├── rsd.bin
│           ├── sa.bin
│           ├── txpInfo.bin
│           └── versionInfo.json
├── 19
│   └── 663679d1d87bfeafacf30c1deaf81b
│       ├── ggal_gut
│       │   ├── aux_info
│       │   │   ├── ambig_info.tsv
│       │   │   ├── expected_bias.gz
│       │   │   ├── fld.gz
│       │   │   ├── meta_info.json
│       │   │   ├── observed_bias.gz
│       │   │   └── observed_bias_3p.gz
│       │   ├── cmd_info.json
│       │   ├── libParams
│       │   │   └── flenDist.txt
│       │   ├── lib_format_counts.json
│       │   ├── logs
│       │   │   └── salmon_quant.log
│       │   └── quant.sf
│       ├── ggal_gut_1.fq -> /data/../ggal_gut_1.fq
│       ├── ggal_gut_2.fq -> /data/../ggal_gut_2.fq
│       └── index -> /data/../asciidocs/day2/work/12/1adacb582d2198cd32db0e6f808bce/index
11.1. How to resume works
The -resume command line option allow the continuation of a pipeline execution since the last step that was successfully completed:
nextflow run <script> -resumeIn practical terms the pipeline is executed from the beginning however before launching the execution of a process. Nextflow uses the task unique ID to check if the work directory already exists and it contains a valid command exit status and the expected output files.
If this condition is satisfied the task execution is skipped and previously computed results are used as the process results.
The first task, for which a new output is computed, invalidates all downstream executions in the remaining DAG.
11.2. Work directory
The task work directories are created in the folder work in the launching path by default. This is supposed to be a scratch storage area that can be cleaned up once the computation is completed.
Workflow final output are supposed to the stored in a different location specified using one or more publishDir directive.
A different location for the execution work directory can be specified using the command line option -w e.g.
nextflow run <script> -w /some/scratch/dir| If you delete or move the pipeline work directory will prevent to use the resume feature in following runs. |
The hash code for input files is computed using:
The complete file path
The file size
The last modified timestamp
Therefore just touching a file will invalidated the related task execution.
11.3. How to organize in silico experiments
It’s a good practice to organize each experiment in its own folder. The experiment main input parameters should be specified using a Nextflow config file. This makes simply to track and replicate the experiment over time.
Note that in the same experiment the same pipeline can be executed multiple times, however it should be avoided to launch two (or more) Nextflow instances in the same directory concurrently.
The nextflow log command lists the executions run in the current folder:
$ nextflow log
TIMESTAMP          	DURATION	RUN NAME             	STATUS	REVISION ID	SESSION ID                          	COMMAND
2020-11-10 22:32:33	1.6s    	friendly_raman       	OK    	96eb04d6a4 	2b90bac5-5124-4933-a345-afb28ca4b184	nextflow run hello
2020-11-10 22:35:39	33s     	condescending_fourier	OK    	708cf52a33 	a8d1ece2-a6cb-493f-b54e-dac7266d2669	nextflow run rnaseq-nf -with-docker
2020-11-10 22:55:30	1.7s    	insane_swanson       	ERR   	708cf52a33 	cc03a378-b524-4cb1-a100-6751dfe2c0b3	nextflow run rnaseq-nf
2020-11-10 22:55:50	25.9s   	focused_mccarthy     	OK    	708cf52a33 	cc03a378-b524-4cb1-a100-6751dfe2c0b3	nextflow run rnaseq-nf -resume -with-docker
You can use either the session ID or the run name to recover a specific execution. For example:
nextflow run rnaseq-nf -resume condescending_fourier -with-docker11.4. Execution provenance
The log command when provided with a run name or session ID can return many useful information about a pipeline execution that can be used to create a
provenance report.
By default, it lists the work directories used to compute each task. For example:
$ nextflow log condescending_fourier

/data/.../work/e0/3192ad7ddc661e3054de66572cf6f9
/data/.../work/08/e7f13a32ccc0b2b1fe0c00bce4bd14
/data/.../work/5e/6dd708bf0e49ccba397d7b629af0e9
/data/.../work/51/1ae924e73bdd8ee91a660ca669fc4d
/data/.../work/5a/1b1ac5e340852e6bb4c2c919504025
/data/.../work/a9/784d05293b429146d2b5a43b352899
Using the option -f (fields) it’s possible to specify which metadata should be printed by the log command. For example:
$ nextflow log condescending_fourier -f 'process,exit,hash,duration'

RNASEQ:FASTQC	0	e0/3192ad	21.2s
RNASEQ:FASTQC	0	08/e7f13a	21.1s
RNASEQ:INDEX	0	5e/6dd708	6.6s
RNASEQ:QUANT	0	51/1ae924	4.1s
RNASEQ:QUANT	0	5a/1b1ac5	3.9s
MULTIQC	0	a9/784d05	10s
The complete list of available fields can be retrieved with the command:
nextflow log -lThe option -F allows the specification of a filtering criteria to print only a subset of tasks. For example:
$ nextflow log condescending_fourier -F 'process =~ /RNASEQ:FASTQC/'

/data/.../work/e0/3192ad7ddc661e3054de66572cf6f9
/data/.../work/08/e7f13a32ccc0b2b1fe0c00bce4bd14
This can be useful to locate specific tasks work directories.
Finally, the -t option allow the creation of a basic custom provenance report proving a template file, in any format of your choice. For example:
<div>
<h2>${name}</h2>
<div>
Script:
<pre>${script}</pre>
</div>

<ul>
    <li>Exit: ${exit}</li>
    <li>Status: ${status}</li>
    <li>Work dir: ${workdir}</li>
    <li>Container: ${container}</li>
</ul>
</div>
Save the above snippet in a file named template.html. Then run this command:
nextflow log condescending_fourier -t template.html > prov.htmlFinally open the file prov.html file with a browser.
11.5. Resume troubleshooting
If your workflow execution is not resumed as expected and one or more task are re-executed all the times, these may be the most likely causes:
-
Input file changed: Make sure that there’s no change in your input files. Don’t forget task unique hash is computed taking into account the complete file path, the last modified timestamp and the file size. If any of these information changes, the workflow will be re-executed even if the input content is the same.
-
A process modifies an input: A process should never alter input files otherwise the resume, for future executions, will be invalidated for the same reason explained in the previous point.
-
Inconsistent file attributes: Some shared file system, such as NFS, may report inconsistent file timestamp i.e. a different timestamp for the same file even if it has not be modified. To prevent this problem use the lenient cache strategy.
-
Race condition in global variable: Nextflow is designed to simplify parallel programming without taking care about race conditions and the access to shared resources. One of the few cases in which a race condition can arise is when using a global variable with two (or more) operators. For example:
Channel
    .from(1,2,3)
    .map { it -> X=it; X+=2 }
    .view { "ch1 = $it" }

Channel
    .from(1,2,3)
    .map { it -> X=it; X*=2 }
    .view { "ch2 = $it" }
The problem in this snippet is that the X variable in the closure definition is defined in the global scope. Therefore, since operators are executed
in parallel, the X value can be overwritten by the other map invocation.
The correct implementation requires the use of the def keyword to declare the variable local.
Channel
    .from(1,2,3)
    .map { it -> def X=it; X+=2 }
    .println { "ch1 = $it" }

Channel
    .from(1,2,3)
    .map { it -> def X=it; X*=2 }
.println { "ch2 = $it" }-
Not deterministic input channels: While dataflow channel ordering is guaranteed i.e. data is read in the same order in which it’s written in the channel, when a process declares as input two or more channel each of which is the output of a different process the overall input ordering is not consistent over different executions.
In practical term, consider the following snippet:
process foo {
  input: set val(pair), file(reads) from ...
  output: set val(pair), file('*.bam') into bam_ch
  """
  your_command --here
  """
}

process bar {
  input: set val(pair), file(reads) from ...
  output: set val(pair), file('*.bai') into bai_ch
  """
  other_command --here
  """
}

process gather {
  input:
  set val(pair), file(bam) from bam_ch
  set val(pair), file(bai) from bai_ch
  """
  merge_command $bam $bai
  """
}
The inputs declared at line 19,20 can be delivered in any order because the execution order of the process foo and bar is not deterministic due to the parallel
executions of them.
Therefore the input of the third process needs to be synchronized using the join operator or a similar approach. The third process should be written as:
...

process gather {
  input:
  set val(pair), file(bam), file(bai) from bam_ch.join(bai_ch)
  """
  merge_command $bam $bai
  """
}
12. Errors handling & troubleshooting
12.1. Execution errors debugging
When a process execution exit with a non-zero exit status, Nextflow stops the workflow execution and report the failing task:
ERROR ~ Error executing process > 'index'

Caused by:          (1)
  Process `index` terminated with an error exit status (127)

Command executed:   (2)

  salmon index --threads 1 -t transcriptome.fa -i index

Command exit status: (3)
  127

Command output:      (4)
  (empty)

Command error:       (5)
  .command.sh: line 2: salmon: command not found

Work dir:            (6)
/Users/pditommaso/work/0b/b59f362980defd7376ee0a75b41f62| 1 | A description of the error cause |
| 2 | The command executed |
| 3 | The command exit status |
| 4 | The command standard output, when available |
| 5 | The command standard error |
| 6 | The command work directory |
Review carefully all these data, they can provide valuable information on the cause of the error.
If this is not enough, change in the task work directory. It contains all the files to replicate the issue in a isolated manner.
The task execution directory contains these files:
-
.command.sh: The command script. -
.command.run: The command wrapped used to run the job. -
.command.out: The complete job standard output. -
.command.err: The complete job standard error. -
.command.log: The wrapper execution output. -
.command.begin: Sentinel file created as soon as the job is launched. -
.exitcode: A file containing the task exit code. -
Task input files (symlinks)
-
Task output files
Verify that the .command.sh file contains the expected command to be executed and all variables are correctly resolved.
Also verify the existence of the file .exitcode. If missing and also the file .command.begin does not exist, the task was never
executed by the subsystem (eg. the batch scheduler). If the .command.begin file exist, the job was launched but the it likely was abruptly killed.
You can replicate the failing execution using the command bash .command.run and verify the cause of the error.
12.2. Ignore errors
There are cases in which a process error may be expected and it should not stop the overall workflow execution.
To handle this use case set the process errorStrategy to ignore:
process foo {
  errorStrategy 'ignore'
  script:
  """
    your_command --this --that
  """
}
If you want to ignore any error set the same directive in the config file as default setting:
process.errorStrategy = 'ignore'
nextflow run rnaseq-nf12.3. Automatic error fail-over
In (rare) cases errors may be caused by transient conditions. In this situation an effective strategy consists in trying to re-execute the failing task.
process foo {
  errorStrategy 'retry'
  script:
  """
    your_command --this --that
  """
}
Using the retry error strategy the task is re-executed a second time if it returns a non-zero exit status before stopping the complete workflow execution.
The directive maxRetries can be used to set number of attempts the task can be re-execute before declaring it failed with an error condition.
12.4. Retry with backoff
There are cases in which the required execution resources may be temporary unavailable e.g. network congestion. In these cases simply re-executing the same task will likely result in the identical error. A retry with an exponential backoff delay can better recover these error conditions.
process foo {
  errorStrategy { sleep(Math.pow(2, task.attempt) * 200 as long); return 'retry' }
  maxRetries 5
  script:
  '''
  your_command --here
  '''
}
12.5. Dynamic resources allocation
It’s a very common scenario that different instances of the same process may have very different needs in terms of computing resources. In such situations requesting, for example, an amount of memory too low will cause some tasks to fail. Instead, using a higher limit that fits all the tasks in your execution could significantly decrease the execution priority of your jobs.
To handle this use case you can use a retry error strategy and increasing the computing resources allocated by the job at each successive attempt.
process foo {
  cpus 4
  memory { 2.GB * task.attempt }  (1)
  time { 1.hour * task.attempt }  (2)
  errorStrategy { task.exitStatus == 140 ? 'retry' : 'terminate' }    (3)
  maxRetries 3   (4)

  script:
  """
    your_command --cpus $task.cpus --mem $task.memory
  """
}| 1 | The memory is defined in a dynamic manner, the first attempt is 2 GB, the second 4 GB, and so on. |
| 2 | The wall execution time is set dynamically as well, the first execution attempt is set to 1 hour, the second 2 hours, and so on. |
| 3 | If the task return an exit status equals to 140 sets the error strategy to retry otherwise terminates the execution. |
| 4 | It can retry the process execution up to three times. |